Not my article, credit goes to "Gustavo Zaera Holo" follow "Original article" URL.
A couple of days ago I posted a howto on running Thunderbird on Ubuntu 11.04 (64bit) as a fully functional client for the Microsoft Exchange 2010 server. This is the version for Ubuntu 11.10 (64 bit).
Thanks to
a link posted by
tanstaalf to a French project named
DavMail,
I was finally able to connect to my company’s Microsoft Exchange 2010
server from my beloved Mozilla Thunderbird client. The solution lies in
installing an Exchange gateway called DavMail.
I run this on my localhost, but this can naturally be set up on any
host. I can verify connecting successfully to the following services:
Email, Calendar and Directory.
Install DavMail on Ubuntu 11.10 (64 bit)
Looking for the instructions for Ubuntu 11.04? Click here.
The sun-java6-* packages are not available in neither Debian’s nor Ubuntu’s repositories:
Oracle
Java (JVM/JDK) will not be available in the Debian / Ubuntu
repositories anymore because Oracle retired the “Operating System
Distributor License for Java” (JDL) and the only release available in
the repositories will be OpenJDK.
A solution to this problem is to manually install OpenJDK and the SWT:
$ sudo apt-get install openjdk-7-jre libswt-gtk-3-java
If you still want the Oracle (Sun) version, you can follow
this HOWTO.
Download and install DavMail (Note, this is not an official package):
$ wget -O davmail_3.9.7-1870-1_all.deb
"http://downloads.sourceforge.net/project/davmail/davmail/3.9.7/davmail_3.9.7-1870-1_all.deb?r=&ts=1327002026&use_mirror=dfn"

$ sudo dpkg -i davmail_3.9.7-1870-1_all.deb
DavMail is now installed. Let’s configure it.
Configure DavMail
Now, start DavMail from the main menu:
Press , and type "davmail"
You should now see an icon in your system tray that looks like this:
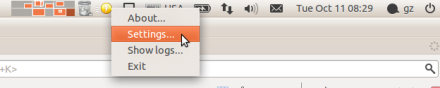
Right click on the icon, choose settings and set the URL to your OWA (Exchange) server (e.g.
https://webmail.mycompany.com/exchange/):
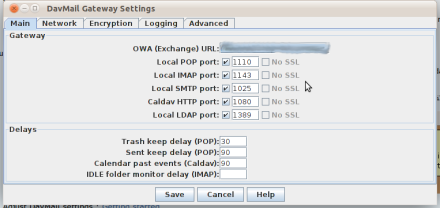
Save, and DavMail is ready to go. You can check out the logs by right clicking on the icon and selecting “Show logs”.
DavMail is made to work for any email client. Here are the instructions for Thunderbird.
Thunderbird 8.0
In Ubuntu 11.10, Thunderbird is the default email client, so you don’t need to install it.
Set up new email account
Open Thunderbird and configure your email servers like this:
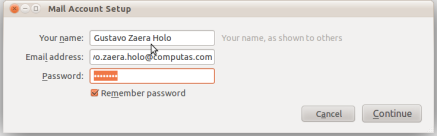
 Your Username must be in the following form: DOMAIN\USER
The email client will complaint that you are using an insecure
connection to the server, but that’s allright, as it runs on localhost.

Configure an existing account
In Thunderbird, go to Edit -> Account Settings, and edit the Server settings, so they look like this:
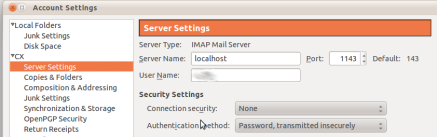 Your Username must be in the following form: DOMAIN\USER
Also, edit the SMTP server settings, so they look like this:
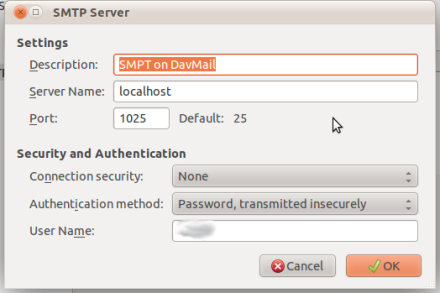 Your Username must be in the following form: DOMAIN\USER
Set up calendar
Install the Lightning 1.0b7 extension via from Tools
-> Addons -> Extensions in Thunderbird. Restart Thunderbird, and
open the Calendar.
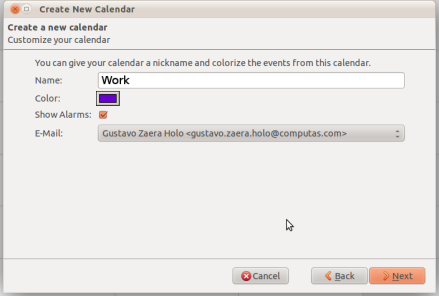
Add a new calendar and use a URL like this:
http://localhost:1080/users/<YOUR FULL EMAIL ADDRESS>/calendar :


 Important note!
 If you leave the Email set to
None, no invitations will be sent to other participants when you arrange meetings.

Set up Directory Service (Active Directory)
Open up the Address book in Thunderbird and add a new LDAP directory like this:

 Note: The Bind DN must be in the following form: DOMAIN\USER

Set up personal address book
Based on what I can gather from the DavMail pages, it seems that the
way to sync a personal address book through DavMail is to use SOGo
Connector Thunderbird extension.
Unfortunately, the sOGO extension is not compatible with any version of Thunderbird later than 3.
But not to worry, I have built the SOGo extension for all versions of
Thunderbird between 3.0 and 9.0 on a 64 bit platform. Just do this:
- Download and install the this file: http://www.zaera-holo.net/static/files/sogo-connector-9.108.xpi
- Follow this howto: http://davmail.sourceforge.net/thunderbirdcarddavsetup.html
Troubleshooting
If you experience getting two emails in your Sent folder, simply go
to the DAVMAIL settings, in TAB advanced, and uncheck the : “SMTP save
in Sent” checkbox.
References


